How to Draw Blossom (Powerpuff Girls) VIDEO & Step-by-Step Pictures

Use the step-by-step drawing instructions below to learn how to draw Blossom from the Powerpuff Girls. Stay tooned for more tutorials!
Stay tooned for more free drawing lessons by:
- Liking us on Facebook>>
- Subscribing on YouTube.com>>
- Visit How2DrawAnimals.com for free animal drawing tutorials>>
All of the free art lessons on EasyDrawingTutorials.com are good drawing tutorials for beginners and experienced artists alike. The online tutorials are easy to follow; they teach you the how to draw basics while showing you how to draw fun cartoon characters step by step. Each cartoon character has a video drawing tutorial option, as well as step-by-step photos and written text to follow.
RELATED TUTORIALS
 |
 |
 |
To draw Blossom step by step, follow along with the video tutorial below and pause the video after each step to go at your own pace. You may find it easier to follow the step-by-step drawings below. The new lines in each step are shown in red, and each step is explained in the text below the photo, so you'll know exactly what to draw in each step. You may want to open the video in a new tab and use both drawing methods! Take your time and draw at your own pace.
The Narrated step-by-step video tutorial:
Intro: Start off with a pencil sketch. In the beginning stages, don’t press down too hard. Use light, smooth strokes for sketching so that it's easy to erase if you make a mistake.
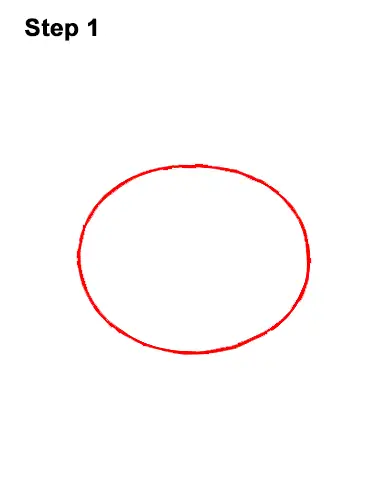
Step 1: Draw a big oval near the middle of the paper as a guide for Blossom's head. First make four marks to determine the oval's height and width. Then connect the marks using curved lines. Make sure that the marks for the sides of the oval (the width) are farther apart than the marks for the top and bottom (the height) of the oval. With every step, sketch lightly at first so that it's easy to erase if you make a mistake.
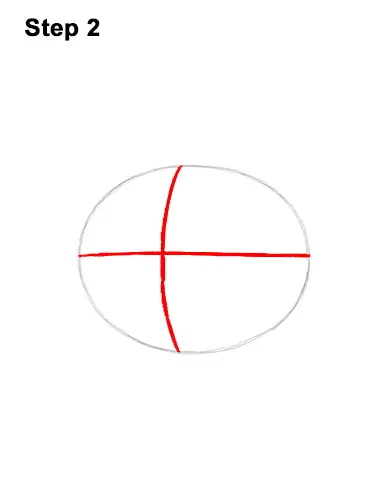
Step 2: Draw a horizontal line across the oval as a construction guide to help you place Blossom's facial features later. Draw a curved vertical line for another construction guide. Place the vertical line a bit closer to the left edge of the head.
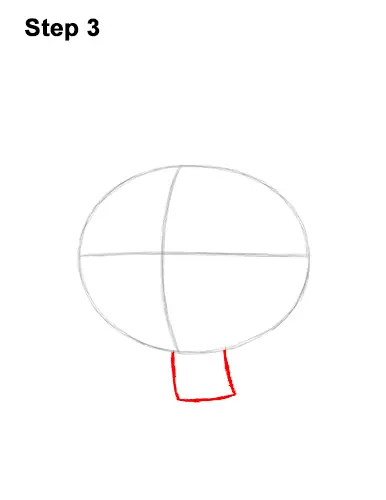
Step 3: Below the head draw a small square-like shape as a guide for the Blossom's body. Pay attention to how small this guide is in relation to the big oval for the head.
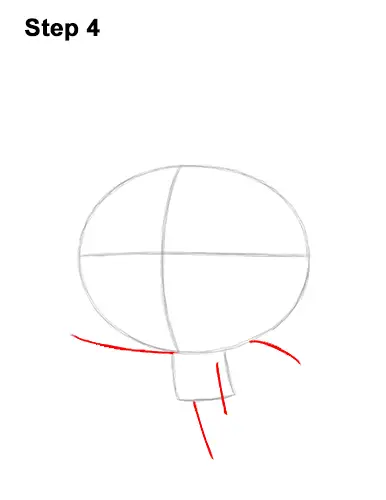
Step 4: Under the head, on either side, draw two long, curved, sloping lines as guides for Blossom's arms. The line on the left should be long and should curve up, while the line on the right should be shorter and it should curve down. Under the body, on the left side, draw a short, vertical line as a guide for the first leg. To the right, mostly within the body, draw another short, vertical line as a guide for the other leg.
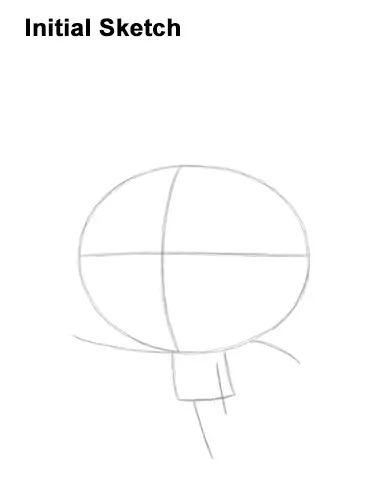
That's it for the guides! For the next steps, use darker lines for a more defined drawing.
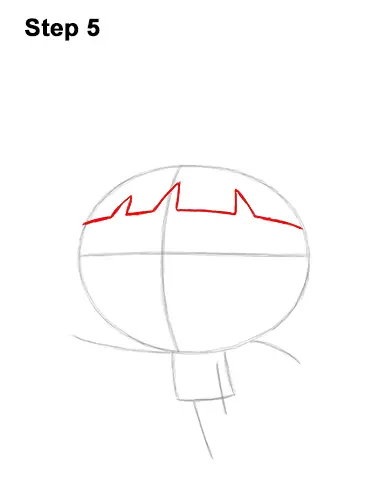
Step 5: Inside the big oval, close to the top edge, draw a long, jagged line for Blossom's bangs or fringe. This line is basically a horizontal line with three spike-like wedges along the shape. Use the construction lines as guides to help you place the bangs.
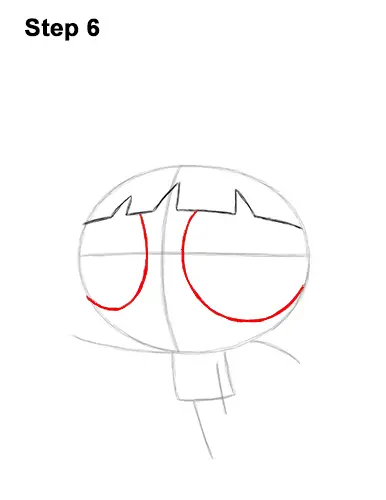
Step 6: Inside the head, draw two huge, almost circle-like lines for Blossom's eyes. Use the vertical construction line to help you place the lines and help you determine the space between them. The line on the left should be slightly smaller because of the way the head is turned.
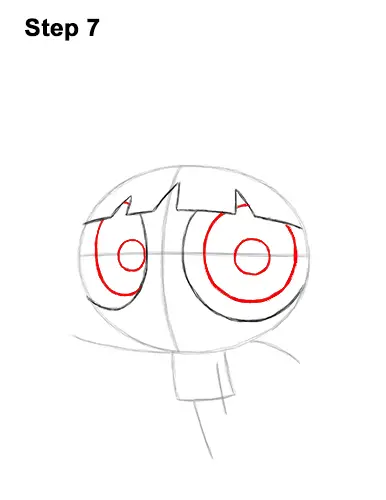
Step 7: Inside each eye, draw a big circular shape for Blossom's pupils. Don't overlap the shape of the bangs or fringe as you draw these shapes. The pupil on the left should be thinner. Inside each pupil, draw a small circle for highlight. Draw these smaller circles along the path of the horizontal construction line.
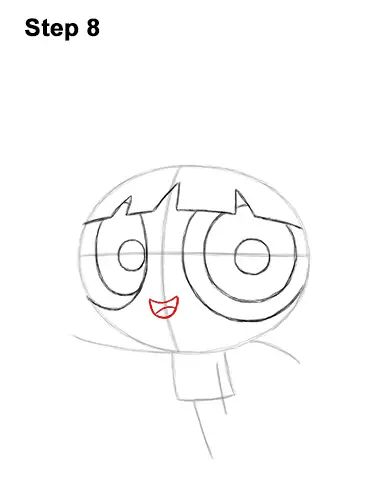
Step 8: Between the eyes, near the bottom, draw a small, curved shape for Blossom's open mouth. The shape should be similar to a crescent moon on its side. Draw the shape along the vertical construction line. Inside the mouth, draw a short, curved line for the tongue.
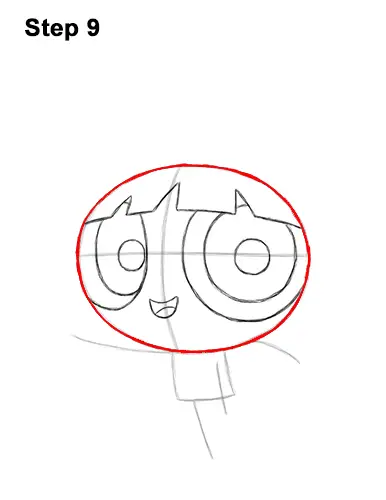
Step 9: Darken the big initial oval to create the shape of Blossom's head.
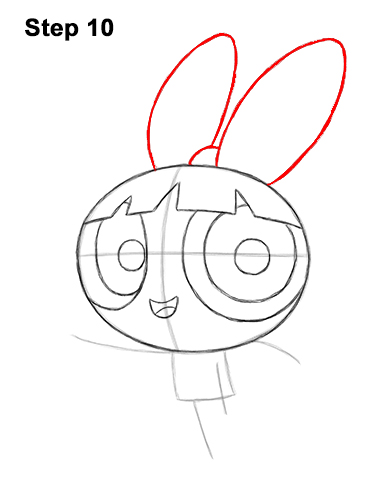
Step 10: On the top, right side of the head, draw a thin, long arc for the first part of Blossom's big bow. The sides of this arc should bulge out a bit. Pay attention to how big this arc is in relation to the head. On the bottom, left side of this arc, draw a small, curved line for the bow's knot. Farther left, draw another thin, long arc that bulges in the middle for the other side of the big bow. The arc on the left should be slightly smaller than the one on the right.
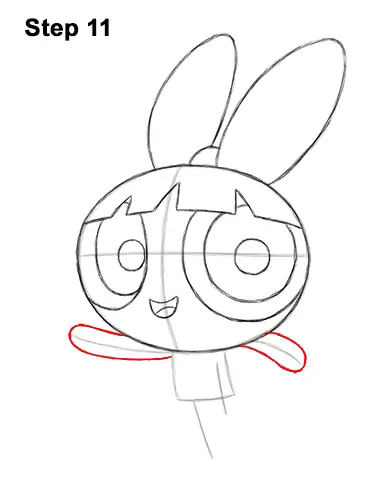
Step 11: Use the initial curved lines under the head as guides to draw Blossom's arms. Follow the path of the guides and draw the shapes of the arms around them. The tips of the arms should be curved with no fingers. The arm on the right should be a bit smaller than the arm on the left.
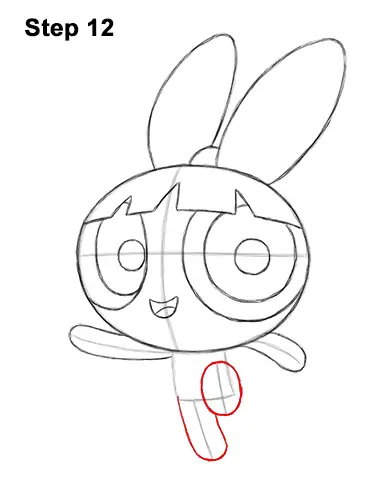
Step 12: Use the vertical lines under the body as guides to draw Blossom's legs the same way as the arms. Follow the path of the guides and draw the shapes of the legs around them. Because the leg on the right is folded up, draw a small oval shape around the guide.
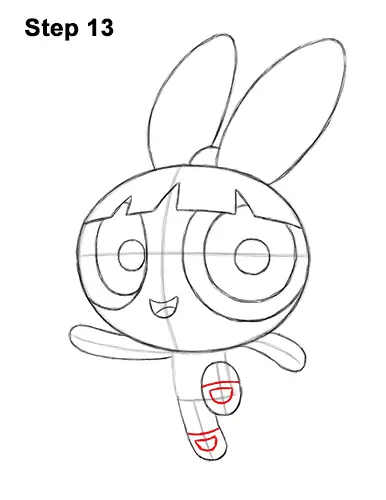
Step 13: Inside each leg, near the bottom, draw a small, curved line for the top part of Blossom's shoes. Inside the shoes draw a shape that's similar to the letter D on it's side for more detail.
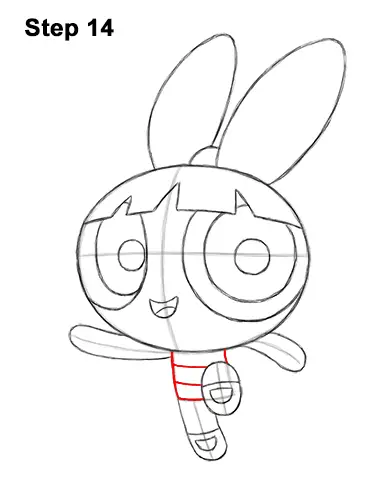
Step 14: Darken the square-like shape under the head to create Blossom's body but don't overlap the shape of the folded leg on the right. Inside the body, draw two short, vertical lines for the stripe on the dress.
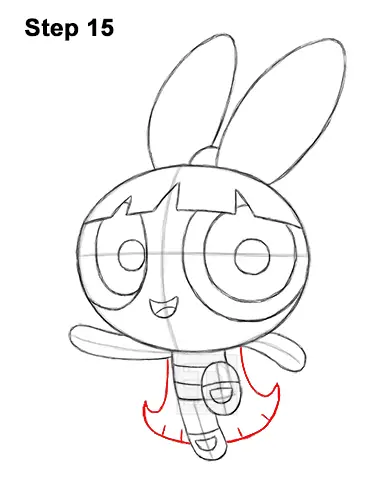
Step 15: On the sides of the body, draw two long, curved lines for Blossom's long hair. The lines curve outward and then up on the sides to form pointy, tips. The bottom of the hair is a long, curved, horizontal line. Don't overlap the shape of the leg on the left as you draw the bottom edge of the hair. Along the lower edge of the hair, draw a few short, vertical lines for extra detail.
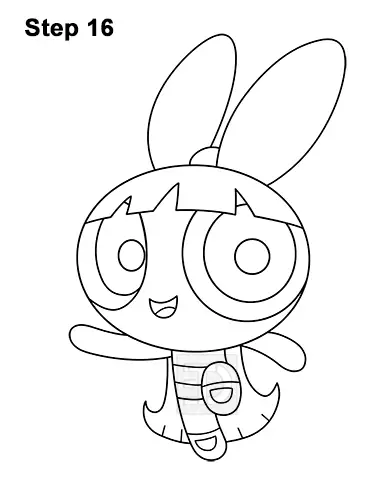
Step 16: Go over the final sketch lines with a pen, marker or any other type of permanent ink. Take your time and be careful when you ink to avoid any accidents. After the ink dries, get rid of every pencil mark with an eraser for a cleaner drawing of Blossom from the Powerpuff Girls.

Final Step: Color your drawing using colored pencils, markers or crayons! Use red-orange for Blossom's bow. Color her hair orange. Use peach or yellow-orange for her skin. Use pink to draw a thick band along the outer edge of the pupils for the eyes' irises. Use pink for the draw and tongue too. Color the inside of the mouth brown.
That's it! You know how a finished drawing of Blossom from The Powerpuff Girls.
Thanks for visiting! Subscribe to the EasyDrawingTutorials YouTube Channel for a new tutorial every Sunday.
To learn how to draw animals, visit How2DrawAnimals.com.
RELATED TUTORIALS
 |
 |
 |


