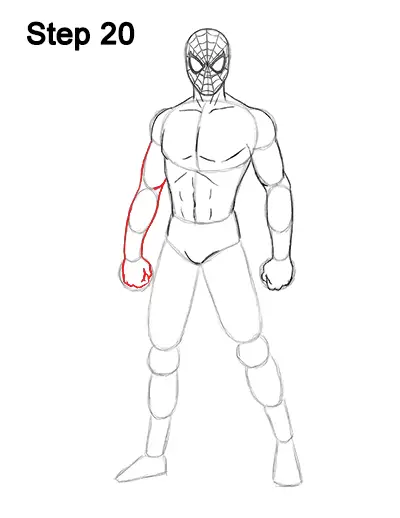
Step 20: Use the shapes on the other side to draw the arm on the left the same way. Simply darken the outer edges of the guides and make sure you make the elbow joint wider than the guides. Use the bottom circle as a guide to draw Spider-Man's fist but this time draw the lines for the folded fingers on the right side.
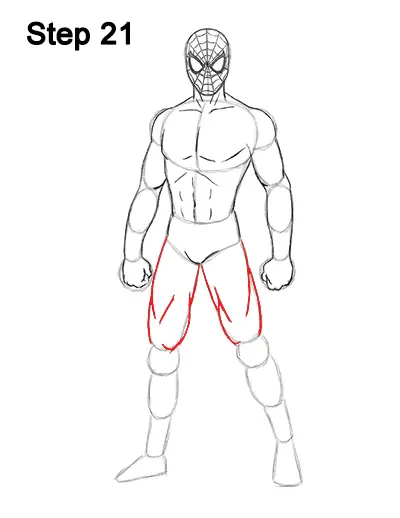
Step 21: Use the U- shaped lines under the torso as guides to draw the top parts of Spider-Man's legs. As you darken the outer shape of the leg, add a few lines coming inward to emphasize the muscle structure. Make the lines bulge out, then come inward as you darken them to create the muscles. Use the image above as reference to determine where the lines for the muscles should go.
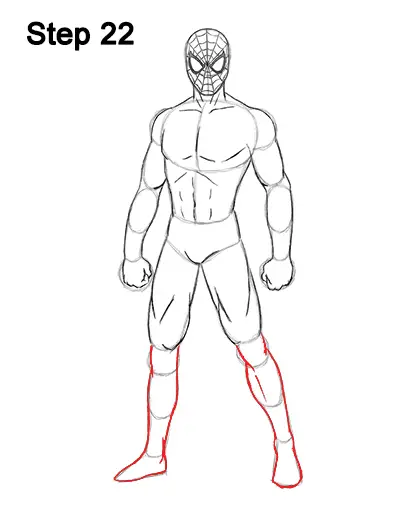
Step 22: Use the remaining shapes as guides to draw the bottom parts of Spider-Man's legs and feet. Simply darken the outer edge of the guides to create the shape of the leg and foot. Draw the leg on the right side the same way. Make the lines for the knee and ankle bulge out a bit and add a line within the shape of the leg for the shin. You can use this as a basic body template (minus the head) for any other character that has a similar body type, like Iceman or Deadpool.
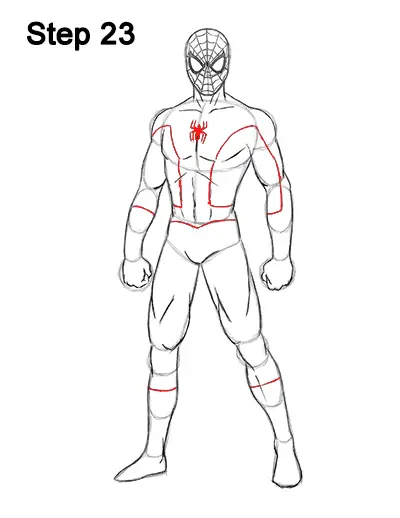
Step 23: Draw the first part of Spider-Man's costume design using a few lines directly over the body. Draw the logo on the chest by first drawing a small diamond over a slightly bigger diamond for the spider's body. Then draw four angled lines coming from the middle of the body pointing up and four pointing down.
Now draw the outline of the design that separates the red color from blue color of Spider-Man's costume. This line starts at the shoulders, then curves down across the sides of the chest and ends at the abdomen. The two lines across the torso should form kind of a V shape. Make the lines bend to contour to the body. Add a horizontal line at the bottom to form a belt-looking strip below the abdomen. The line on the right should continue down the arm to create a glove-like design at the forearm. Add a line on the other arm too. Draw a couple of curved lines at the top of the shins for the boot-like design at the bottom.
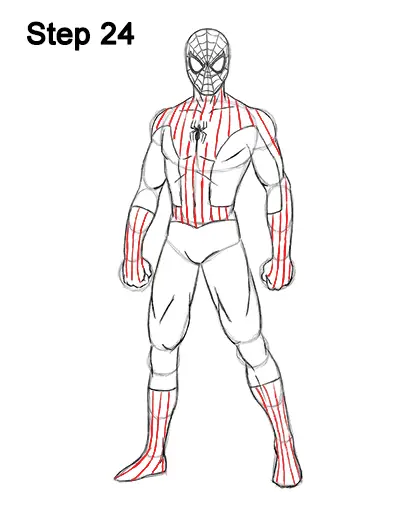
Step 24: Draw a series of vertical lines inside the previous design for the first part of the webbing. Pay close attention to the spacing of the vertical lines. Don't make them too wide or too narrow. Bend the lines as you draw them to contour to the shape of Spider-Man's muscles.
Use the image above as reference to pinpoint exactly where each vertical line should go. The vertical lines should stretch all the way down to the glove- like sections of the forearms and hands. The lines inside the boot-like sections should curve toward the tip and get a bit wider at the end. This process can be very time- consuming, so be patient and take breaks as you draw the lines.


