How to Draw Taz
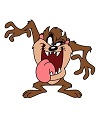
Use the video and step-by-step drawing instructions below to learn how to draw Taz, the Tasmanian Devil from the Looney Tunes cartoons. A new cartoon drawing tutorial is uploaded every week, so stay tooned!
Intro : Start drawing Taz with a pencil sketch. In the beginning stages, don't press down too hard. Use light, smooth strokes for sketching.
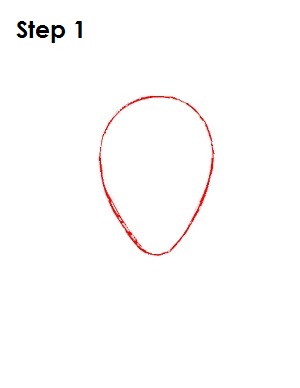
Step 1: To draw Taz, stat with a big egg shape that points down in the middle of the page. This is the basic shape for Taz's head/body.
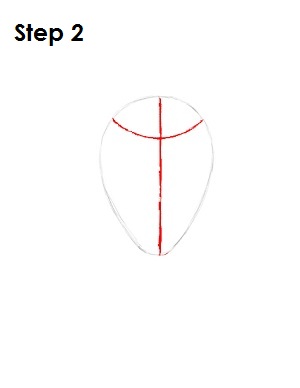
Step 2: Next draw a horizontal line and vertical line across the egg shape. Draw the vertical line straight across the middle, and draw the horizontal one curved and near the top of the shape. These will be construction lines that will help you place Taz's facial features later on.
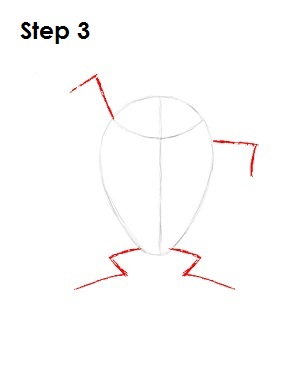
Step 3: Now draw two L-shaped lines near the top of the egg shape for Taz's arms and draw two Z-shaped lines at the bottom for his legs. These angled lines will help as guides later on when you add Taz's appendages.
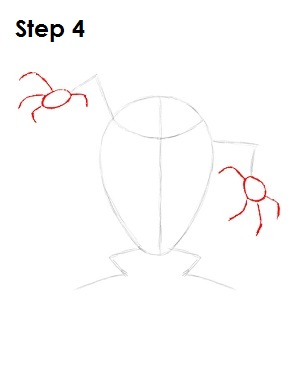
Step 4: At the end of each arm draw a small oval for the palms of his hands. Next draw a series of four lines from the edges of each oval for his fingers. Again, these will be guides for Taz's hands later.
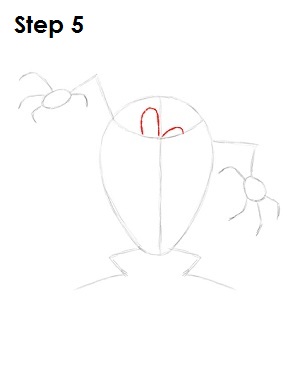
Step 5: Draw two curves on top of the horizontal construction lines for Taz's eyes. Draw the left curve as a big upside-down U shape, and draw the right curve smaller and flatter. This will give Taz that crazed look he has.
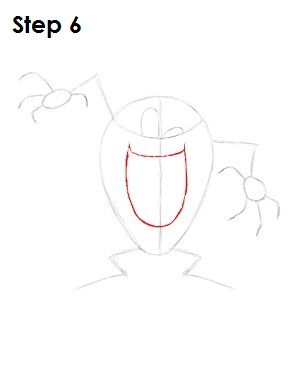
Step 6: For Taz's mouth, draw a huge U shape below the horizontal construction line. Close the top of this curve by drawing a shorter, shallower curve above it.
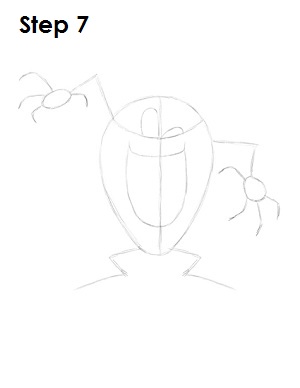
Step 7: That's it for the initial sketch of Taz, the Looney Tunes cartoon character! You have the basic Taz shape, so now go in and tighten your drawing. From this point on, press harder with your pencil in order to get darker lines and a more defined sketch.
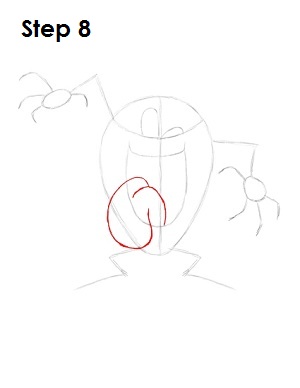
Step 8: Start by drawing in Taz's big slobbery tongue. Just draw a couple of curves that start at the mouth and extend toward the outside of the egg shape.
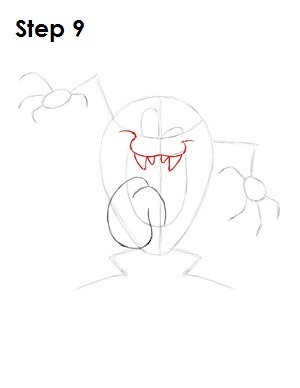
Step 9: Now draw the top part of Taz's mouth using the top line of the mouth shape as a guide. Curve the shape more and give Taz smile lines at either end of it. Below this line give Taz a few teeth by drawing four curved triangles. Draw the outer two triangles bigger than the inner two.
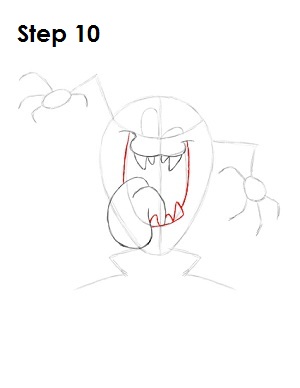
Step 10: Draw the bottom part of Taz's mouth by giving him three curved triangles for teeth and closing up the sides of his mouth.
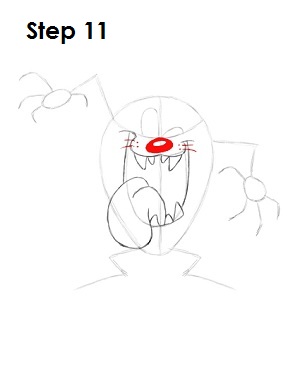
Step 11: Draw a big lopsided oval below the horizontal construction line for Taz's nose. Shade it in except for a smaller oval within it that represents glare. Draw a couple of whiskers on either side of his mouth and a few dots for detail.
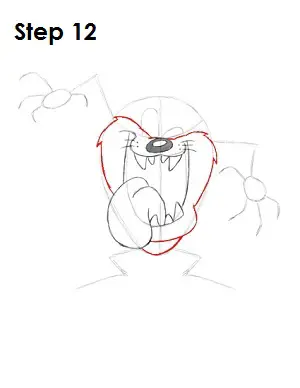
Step 12: Using the main egg shape as a guide, draw in the rest of Taz's body. Make sure you draw a few jagged angles at the top of his cheeks to represent tufts of fur.
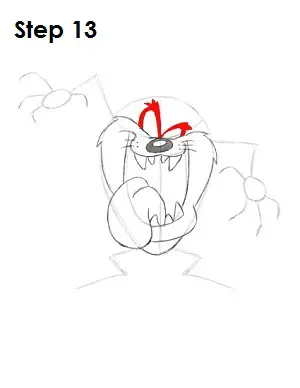
Step 13: Tighten the shapes of Taz's eyes by drawing thicker lines. Draw a few jagged edges at the top of the curves for a more rugged, furry look and shade in the shapes.
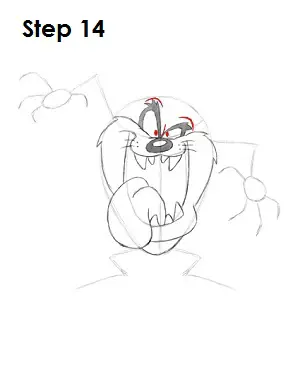
Step 14: Draw in small ovals inside Taz's eyes for pupils and shade them in. Above each eye draw a curved line to represent his brow and where his eyes meet draw a line to indicate a wrinkle when Taz furrows his brow.
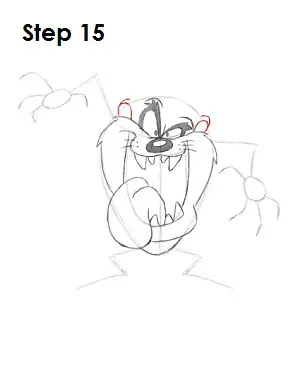
Step 15: Add Taz's ears by drawing a couple of C-shaped curves on top of his cheeks. Then draw in a curve inside each of these curves for the inside of his ears.
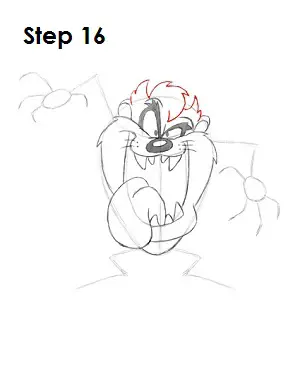
Step 16: Tighten the top of Taz's head by drawing a series of curves with jagged edges. Draw two jagged spikes of fur near his ears as his "devil horns" and draw more curves in the middle of his head for his top tuft.
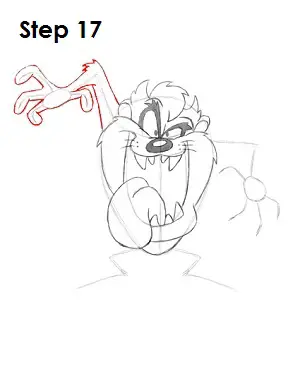
Step 17: Draw in the left arm by using the guides. Tighten the shape of Taz's arm and draw tufts of fur at his elbow. Thicken up his fingers and round them out.
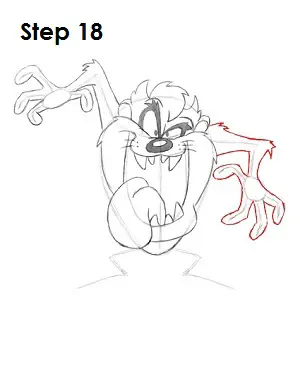
Step 18: Do the same thing for the right arm, and this time draw spiked tufts of fur not only on his elbow but Taz's shoulder, as well. Tighten Taz's hand too.
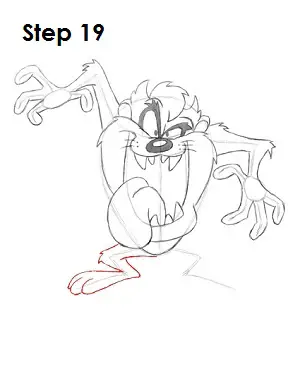
Step 19: Using the guide for Taz's leg, tighten the left leg first. Draw a few furry tufts at the knee and draw three toes using curves at the end of his foot.
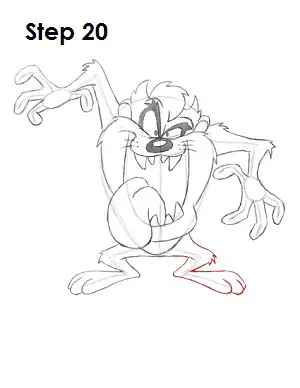
Step 20: Do the same thing for the right leg. Don't forget to draw Taz's furry knees and three toes!
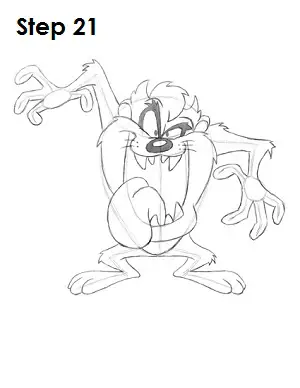
Step 21: That's it! You now have a nice sketch of Taz, the Looney Tunes cartoon character. You can stop at this quick drawing for a rough, sketchy look or go for a more finished look by continuing to the step below.
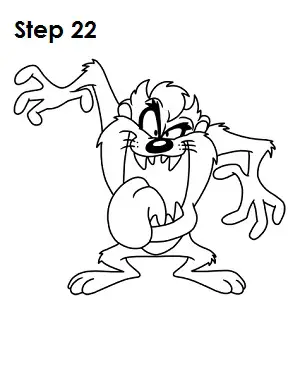
Step 22: For a more finished, inked look, carefully draw over the final sketch lines with a pen or marker. Wait for the ink to dry, and then get rid of every pencil mark with an eraser. You now have a finished inked drawing of Taz from Looney Tunes! You can stop here or go to the final step to complete your Taz drawing.
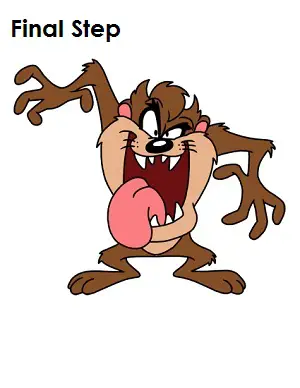
Final Step: For a completely finished Taz drawing, you have to color it. You can use markers, color pencils or even crayons! Color Taz’s head and appendages brown. The inside of his ears and tongue are pink. The rest of Taz's face and body is light brown, and the inside of his mouth is dark red. That's it! You now have a completed drawing of Taz, the Tasmanian Devil from the Looney Tunes cartoons.
RELATED TUTORIALS
 |
 |
 |
 |
 |


