How to Draw Coffin with a Zombie Hand for Halloween Step-by-Step Pictures
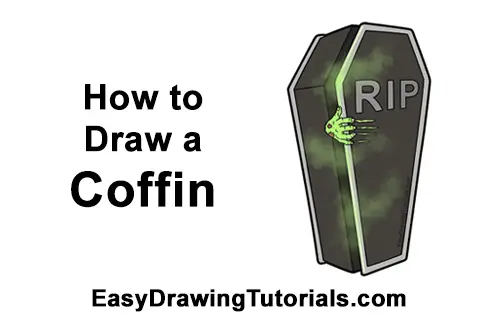
Use the step-by-step drawing instructions below to learn how to draw a creepy Coffin with a Zombie hand coming out of it for Halloween. Stay tooned for more tutorials!
Stay tooned for more free drawing lessons by:
- Liking us on Facebook>>
- Subscribing on YouTube.com>>
- Visit How2DrawAnimals.com for free animal drawing tutorials>>
All of the free art lessons on EasyDrawingTutorials.com are good drawing tutorials for beginners and experienced artists alike. The online tutorials are easy to follow; they teach you the how to draw basics while showing you how to draw fun cartoon characters step by step. Each cartoon character has a video drawing tutorial option, as well as step-by-step photos and written text to follow.
RELATED TUTORIALS
 |
 |
 |
To draw this scary Halloween Coffin, follow step-by-step drawings below. The new lines in each step are shown in red, and each step is explained in the text below the photo, so you'll know exactly what to draw in each step.
Intro: Start off with a pencil sketch. In the beginning stages, don’t press down too hard. Use light, smooth strokes for sketching.

Step 1: Draw two small, curved shapes in the middle of the paper for the zombie's first fingers. Notice how the shapes bend twice to create the joints. At the tip of each finger draw a small irregular shape for the cracked nails. If you don't get the shapes exactly right, it's okay because zombies are undead and have messed up fingers anyway!
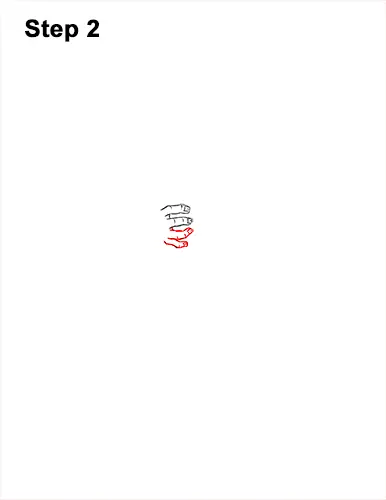
Step 2: Below that, draw two more thin, curved shapes for the other fingers. Pay attention to how these fingers curve in comparison to the fingers at the top. These fingers should also be a bit smaller. Angle the lines a bit for the joints and add the nails at the tip.
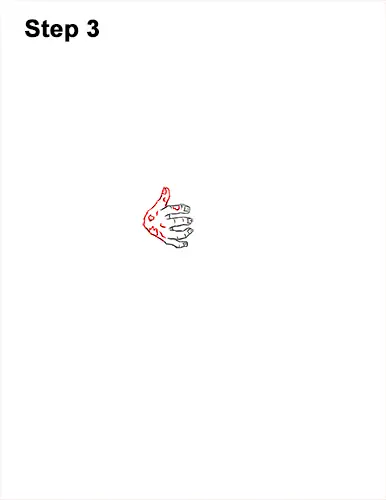
Step 3: On the top part of the fingers, draw a shorter, curved shape for the thumb. Add a small, irregular, square-like shape on the tip for the rotting nail. Draw a curved line on the left for the rest of the hand. Inside the hand, draw a couple of jagged shapes for the rotting flesh.
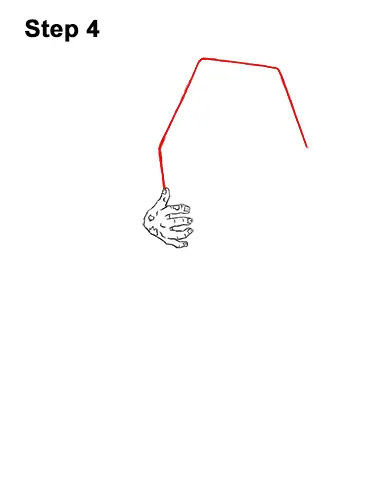
Step 4: Starting on top of the hand, draw a long line that angles to the right and then down for the first part of the coffin's lid. The top part of this shape should be narrow and the bottom wide. The longer this line is, the bigger the coffin will be.
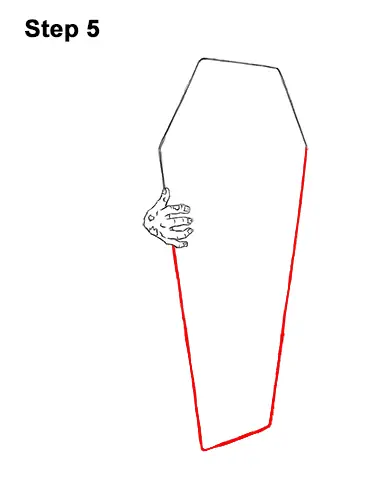
Step 5: Below the hand, draw an even longer angled line for the bottom part of the coffin's lid. The lines on the sides should be long and they should slope inward a bit so that the bottom edge is narrow.
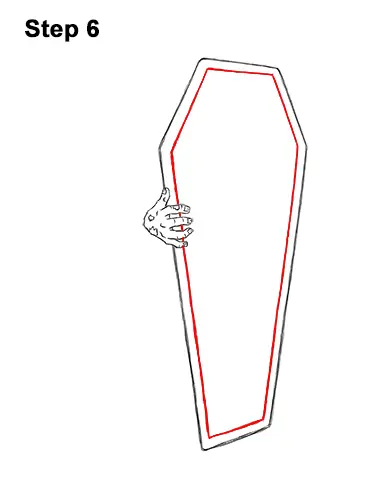
Step 6: Inside the coffin lid, draw a shape that's exactly the same as the lid to create a border. Simply follow the edges of the original lid and draw a smaller shape inside.
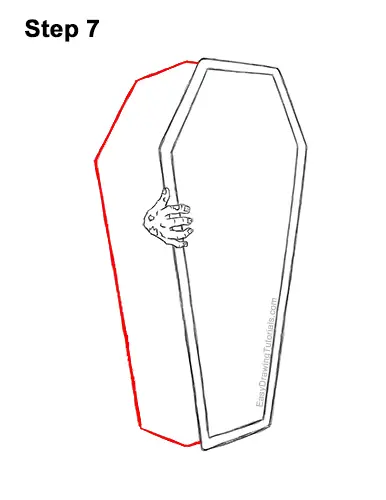
Step 7: To the left of the lid, draw another long, angled line for the main part of the coffin. Pay attention to how and where this line bends. The angles are similar to the left side of the lid. The farther to the left this line is, the deeper the coffin will be.
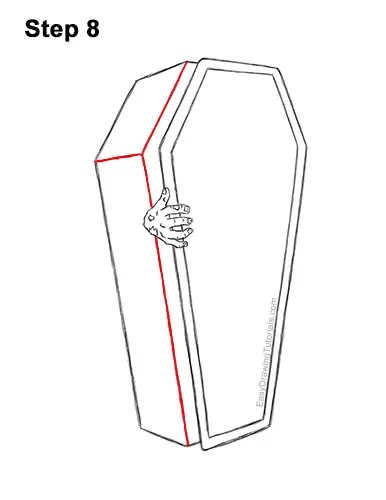
Step 8: Add another long, angled line to the left of the lid for the coffin's opening. The angle of this lines should be the same as the angle on the left side of the lid. Draw a shorter line on the side to divide the side panels on the shape of the coffin.
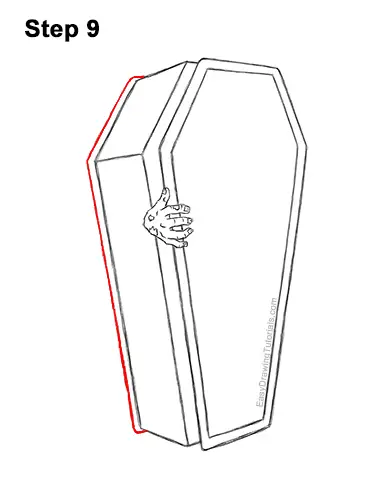
Step 9: Draw an long, angled line on the left side of the coffin for an extra bottom edge. Keep this line close to the shape of the coffin.
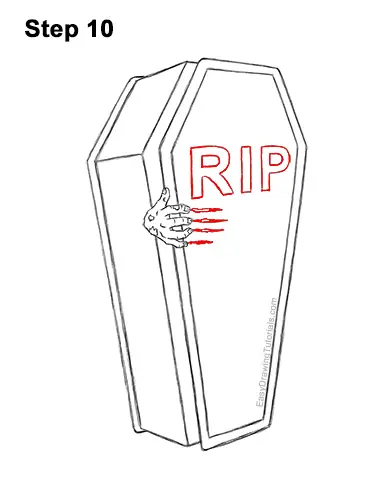
Step 10: This step is optional. Write RIP (Rest In Peace) in front of the coffin using big bold letters. Notice that the letter R is big and the letter I is smaller and the letter P is the smallest because of the perspective on the lid. You can also draw anything else you want on the lid like a cross. If you'd like you draw a few lines to the right of the fingers for scratches on the lid.
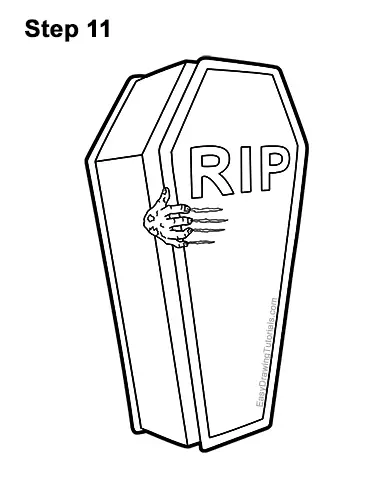
Step 11: Go over the final sketch lines with a pen, marker or any other type of permanent ink. Take your time and be careful when you ink to avoid any accidents. After the ink dries, get rid of every pencil mark with an eraser for a cleaner drawing of a coffin.
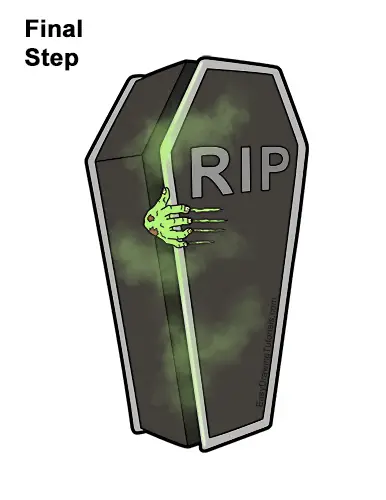
Final Step: Color your coffin drawing using colored pencils, markers or crayons! For this look, lightly use yellow green on the left side of the lid for creepy smoke and dust. Color the rest of the coffin black but color lightly over the smoke so that the yellow-green still stands out. Color the edges of the coffin and the RIP letters gray. Use yellow-green for the zombie's hand and for the scratches on the lid. Use a bit of brown and yellow on the hand for extra detail.
That's it! You know how a finished drawing of a creepy coffin with a zombie hand coming out of it for Halloween!
Thanks for visiting! Subscribe to the EasyDrawingTutorials YouTube Channel for a new tutorial every Sunday.
To learn how to draw animals, visit How2DrawAnimals.com.
RELATED TUTORIALS
 |
 |
 |


