How to Draw Wolverine

Use the video and step-by-step drawing instructions below to learn how to draw Wolverine from Marvel Comics' X-Men. A new drawing tutorial is uploaded every week, so stay tooned!
Intro: There are different versions of Wolverine, from comic books to cartoons to movies. This drawing is based on one of the designs used in the comic books, the yellow costume. Different pencilers have different styles, too, so feel free to add your own take on Wolverine!
When learning how to draw X-Men's Wolverine, start off with a pencil sketch. In the beginning stages, don’t press down too hard. Use light, smooth strokes for sketching.
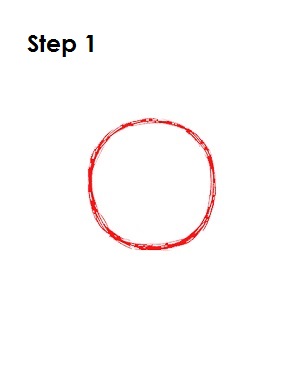
Step 1: The first step when learning how to draw Wolverine is to draw a circle near the top half of the page. The circle doesn’t have to be perfect. It’s just a guide for the top of Wolverine's head. Leave enough room at the bottom to draw the lower part of Wolverine's head and on the sides for the flaps on his mask.
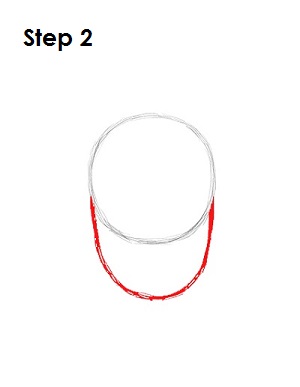
Step 2: Under the circle, draw an arc similar to the letter U as a guide for Wolverine's jaw and chin. The distance from the lower part of the circle to the lower part of the U-shaped arc should be about half of the original circle. Both of the shapes combined form the guide for Wolverine's head.
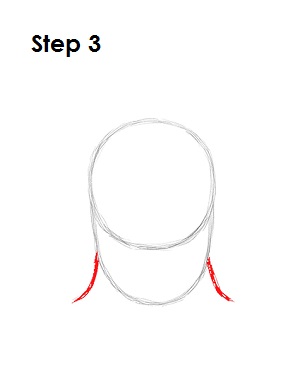
Step 3: On the sides of the head shape, draw two curved lines as guides for Wolverine's neck. Wolverine is short and stocky, so don't draw his neck directly under his head as with other characters. Wolverine's neck should be wider and close to the sides of the head.
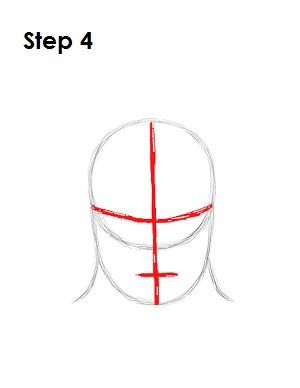
Step 4: Draw a vertical line that splits the head shape in half. Draw a curved horizontal line on the lower part of the original circle that begins and ends at the ends of the U-shaped arc. Draw a small line in the space between the bottom of the main circle and the bottom of the arc. These are guide lines that will help you when learning how to draw Wolverine's facial features later.
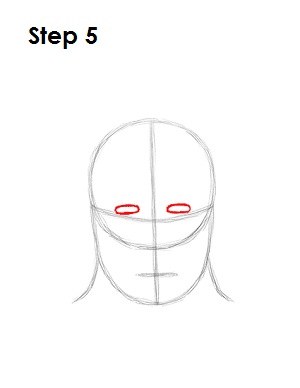
Step 5: Draw two small oval-like shapes as guides for when you learn how to draw Wolverine's eyes later on. Place these shapes on either side of the vertical construction line, sitting right on top of the horizontal construction line.
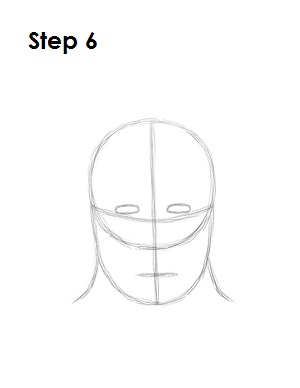
Step 6: That’s it for the initial sketch! You have learned how to draw Wolverine's basic shape. Now go in and tighten your drawing. When learning how to draw Wolverine from this point on, press harder with your pencil in order to get darker lines and a more defined sketch.
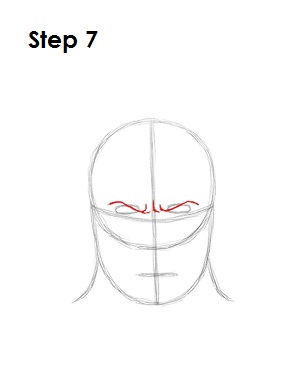
Step 7: Draw an angled line that comes across each eye for Wolverine's furrowed eyebrows. The lines curve up near the middle where you can draw a couple more lines for extra wrinkles.
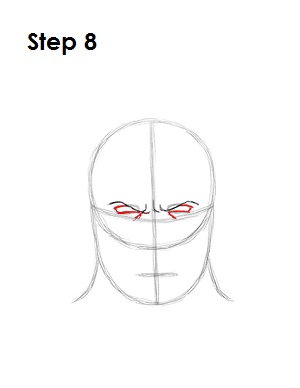
Step 8: Now learn how to draw Wolverine's eyes. Use the initial oval-like shapes as guides to draw them. Darken the edges of the ovals to form the eye shape. Draw a small diagonal line under each shape for the bags under his eyes.
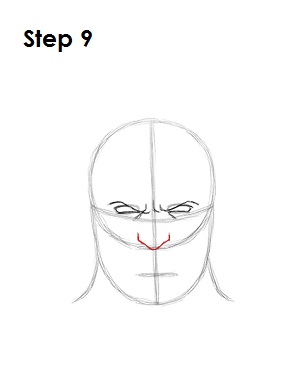
Step 9: At the bottom of the original circle, draw a line for Wolverine's nose. The line should have a shape similar a wide letter V with pointier ends.
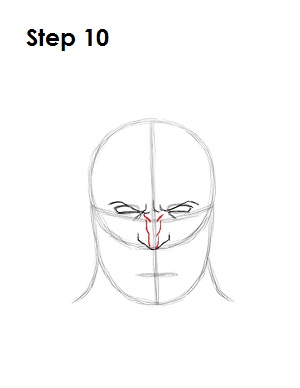
Step 10: Add the bridge of Wolverine's nose by drawing a few vertical lines that go from the tip of his nose all the way to the furrowed brow.
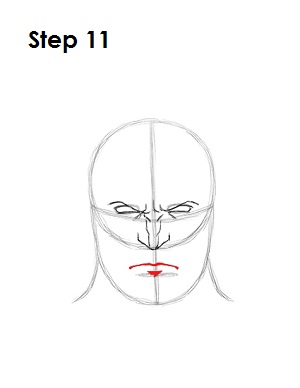
Step 11: Draw Wolverine's mouth sitting on top of the small horizontal line. The lower lip rests directly on top of the line. Add some shading on the bottom. Wolverine's actual mouth is simply a line that bends downward a bit.
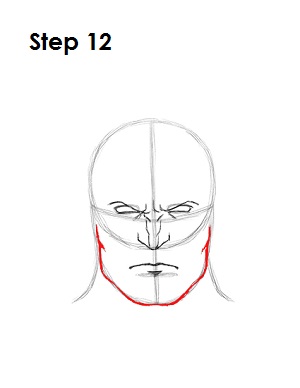
Step 12: Use the U-shaped arc as a guide to draw Wolverine's jaw and chin. Darken the line as you follow the basic path of the arc. Make both the sides of the jaw and the chin wider.
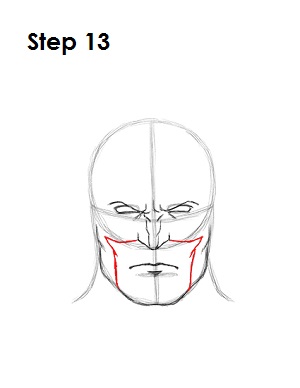
Step 13: Now learn how to draw Wolverine's mask. First draw a few lines inside the face for the opening of the mask. Draw a couple of curved horizontal lines on the sides of the nose, then add a few curved vertical lines on the sides between the mouth and the sides of the jaw.
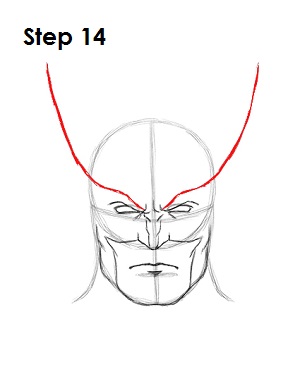
Step 14: Wolverine's mask is unique and can be drawn different ways. The most distinctive feature is the flaps on the sides. Draw them as tall or as short as you'd like. Start a line above each eyebrow and move it up, curving above the head. Sketch the line lightly at first to make sure you get the height and structure you want, and then darken it. The final product should be similar to the letter V or U above Wolverine's head.
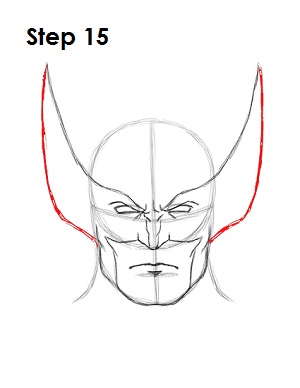
Step 15: Finish up Wolverine's mask flaps by drawing another set of lines on the sides. These lines make up the points on the flaps and should angle in toward the top of the jaw.
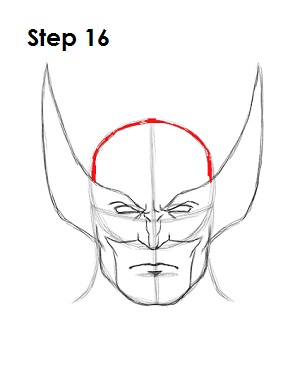
Step 16: Darken the top of the original circle to create the top part of Wolverine's mask and his head.
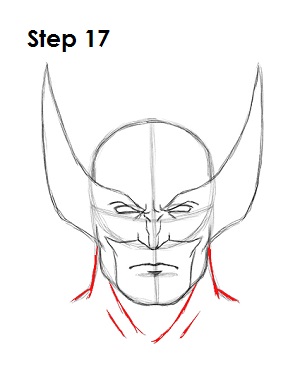
Step 17: Darken the lines that make up Wolverine's neck. Draw a few more lines under his chin for his strong neck muscles.
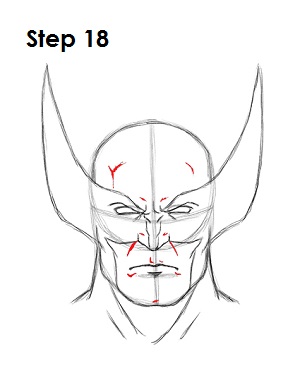
Step 18 (optional): Wolverine's healing factor has kept him young for many years, but he's still an old man. If you'd like, you can draw more lines and wrinkles throughout Wolverine's face for extra detail. This gives him character and a more rugged look.
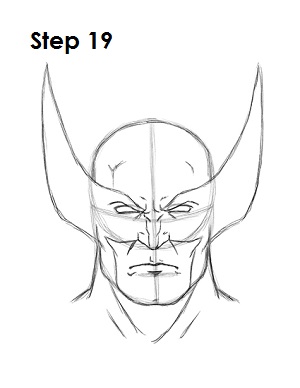
Step 19: That’s it! You now have a nice sketch of the mutant Wolverine from Marvel Comics' X-Men. You can stop at this quick drawing for a rough, sketchy look or go for a more finished look by continuing to the step below.
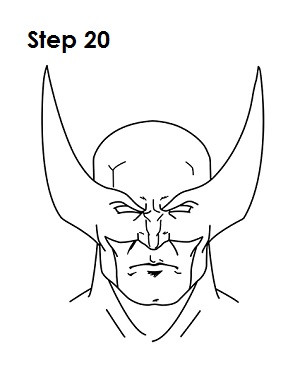
Step 20: For a more finished, inked look, carefully draw over the final sketch lines with a pen or marker. Wait for the ink to dry, and then get rid of every pencil mark with an eraser. You now have a finished inked drawing of Wolverine! You can stop here or go to the final step to complete your Wolverine drawing.
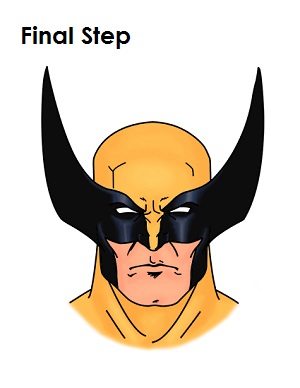
Final Step: For a completely finished Wolverine drawing, you have to color it. You can use markers, color pencils or even crayons! The top of Wolverine's head and neck are yellow. The flaps on his mask are black. You can add a bit of blue on the inside near the eyes for a sleek and shiny look. His skin is peach. If you don't have peach, improvise and use light brown or yellow-orange. Experiment! That’s it! You have now learned how to draw Wolverine from Marvel's X-Men.


