How to Draw Luigi (Full Body) VIDEO & Step-by-Step Pictures
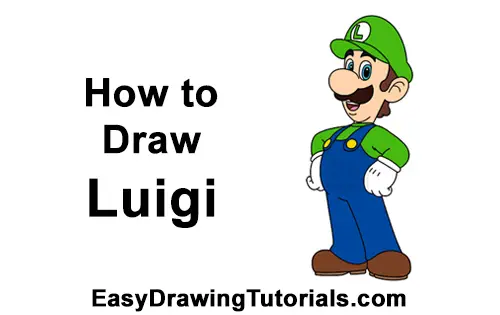
Use the video and step-by-step drawing instructions below to learn how to draw Luigi (Full Body) from Nintendo's Super Mario video games. Stay tooned for more tutorials!
Stay tooned for more free drawing lessons by:
- Liking us on Facebook>>
- Subscribing on YouTube.com>>
- Visit How2DrawAnimals.com for free animal drawing tutorials>>
All of the free art lessons on EasyDrawingTutorials.com are good drawing tutorials for beginners and experienced artists alike. The online tutorials are easy to follow; they teach you the how to draw basics while showing you how to draw fun cartoon characters step by step. Each cartoon character has a video drawing tutorial option, as well as step-by-step photos and written text to follow.
RELATED TUTORIALS
 |
 |
 |
To draw Luigi step by step, follow along with the video tutorial below and pause the video after each step to go at your own pace. You may find it easier to follow the step-by-step drawings below. The new lines in each step are shown in red, and each step is explained in the text below the photo, so you'll know exactly what to draw in each step. You may want to open the video in a new tab and use both drawing methods! Take your time and draw at your own pace.
The written step-by-step video tutorial:
Intro: Start off with a pencil sketch. In the beginning stages, don’t press down too hard. Use light, smooth strokes for sketching.
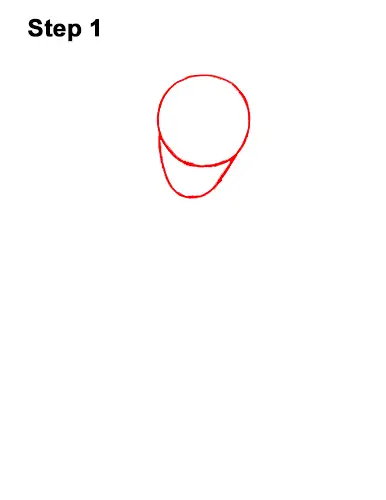
Step 1: Start by drawing a circle near the top of the paper as a guide for Luigi's head. First make four small marks to determine the circle's height and width. Then connect the marks using curved lines. If you're struggling to draw the circle, just trace the outer rim of a small, circular object like a coin or a bottle cap. Below the head, not too far down, make a small mark for the first part of the bottom half of the head. Connect the mark to the circle using curved lines to form the guide for this Nintendo video game character's chin and jaw.
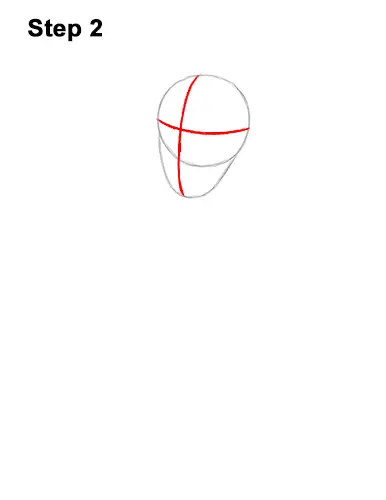
Step 2: Draw a curved, horizontal line across the circle as a guide to help you place Luigi's facial features later. Draw a vertical line across the entire head shape, close to the left side, for another guide.
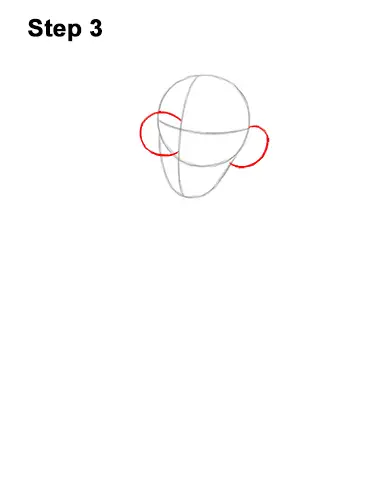
Step 3: To the left of the vertical line, raw a small, curved, C-shaped line as a guide for Luigi's nose. The left side of this line should be outside the head. Pay attention to the size in relation to the head. On the right side of the head, draw a thinner small, curved line as a guide for the ear.
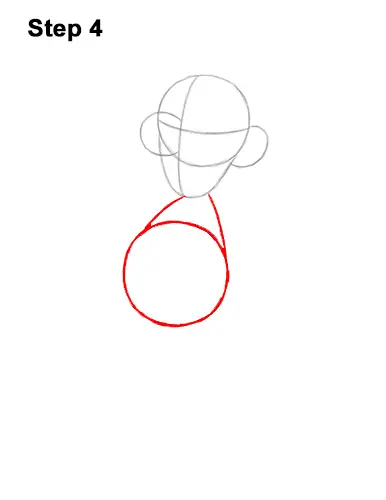
Step 4: Below the head, not too far down, draw a small circle as a guide for the first part of the body. Use the four-marks method to draw this circle too. Don't draw the circle too far down, or the body will be too long. Pay attention to the size of the circle in relation to Luigi's head. It should be slightly bigger than the head. Draw two short lines that connect this circle to the head to complete the guide for this Super Mario Bros. character's body.
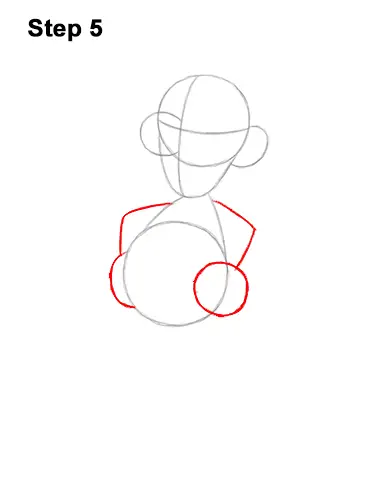
Step 5: Starting on the top, right side of the body, draw an angled line as a guide for Luigi's first arm. At the bottom of the line, draw a small circle that partially overlaps the body as a guide for the hand. To the left of the body, draw a slightly shorter angled line as a guide for the other arm. At the bottom, draw a half circle as a guide for the arm that's partially behind Luigi's body.
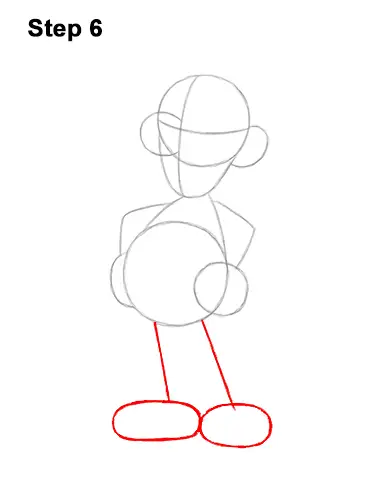
Step 6: Under the body, on the right, draw a long, sloping, vertical line as a guide for the first leg. At the bottom of the line, draw a small oval as a guide for Luigi's first shoe. To the left, draw another long, sloping, vertical line as a guide for the other leg. At the bottom, draw a long oval on its side as a guide for the other shoe.
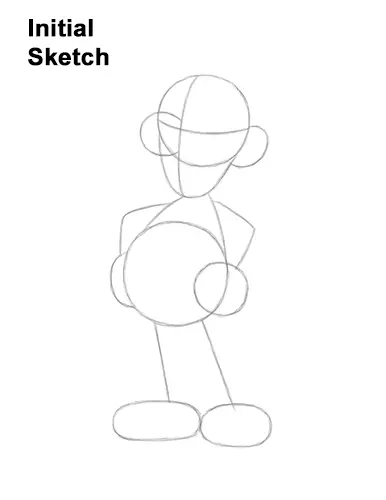
That's it for the guides! For the next steps, use darker lines for a more defined drawing of Luigi from Nintendo's Super Mario Bros. video games.
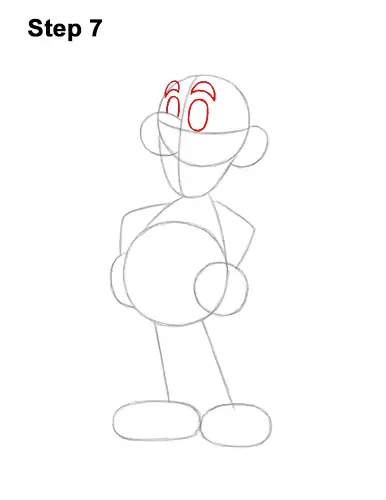
Step 7: Inside the head, to the right of the vertical guide line, draw a small oval for the first eye. Place Luigi's eye on top of the horizontal guide line. Pay attention to the size of the eye in relation to the head. To the left, draw a half oval for the other eye. This eye will be behind the nose, so don't overlap the shape. Above the eyes, draw two thin, curved shapes with pointy sides for the eyebrows. The eyebrow on the left should be smaller than the one on the right. It should also be outside of the head a bit. The shapes of Luigi's eyebrows should be similar to a crescent moon on its side.
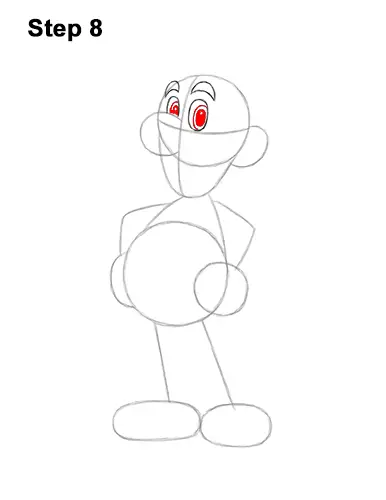
Step 8: Inside each eye, on the right side, draw a smaller oval for the irises. Inside each iris, draw an even smaller oval for the pupils. The shapes for the eye on the left should not overlap the nose. Shade Luigi's pupils except for a tiny circle at the top of each for highlights.
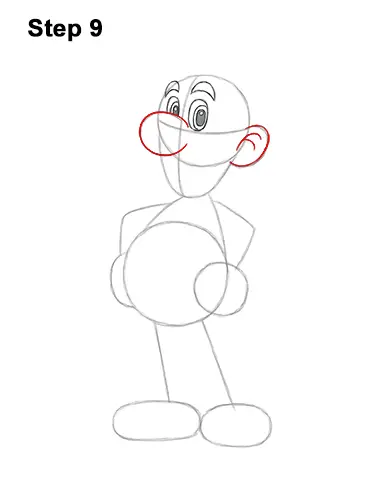
Step 9: Darken the C-shaped line on the left side of the head to create the nose of this Nintendo video game character. Make the ends of the line a bit longer. Darken the curved shape on the right for Luigi's ear. Draw a couple of short, curved lines inside the ear for the inner structure.
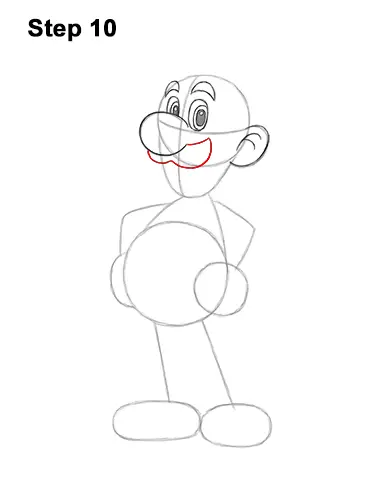
Step 10: Under the nose, draw Luigi's big mustache using a few curved lines. Use the bottom edge of the initial circle as a guide to how big the mustache should be. The left side of the mustache should be smaller, and it should be partially outside of the initial circle.
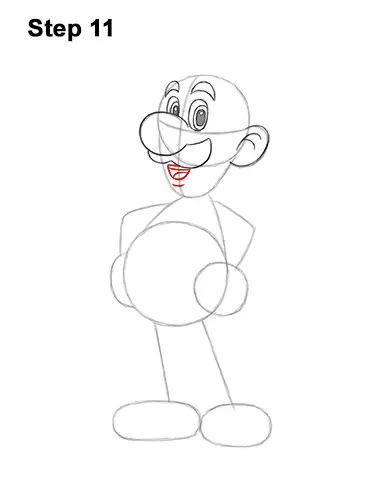
Step 11: Below the mustache, draw a small shape that's similar to the letter D on its side for the open mouth. Inside Luigi's mouth, draw two short lines for the teeth and tongue. Draw another line under it for the lower lip.
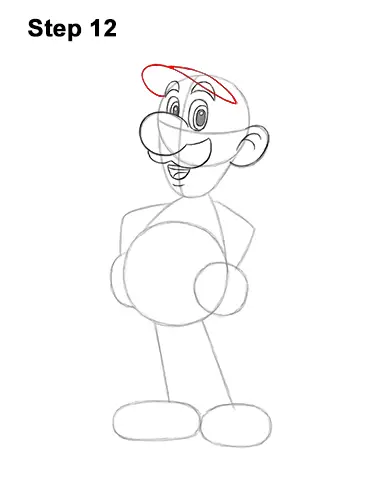
Step 12: Along the top of the head, lightly sketch a thin, tilted shape with pointy sides for the first part of the cap's bill. This shape should be similar to a triangle. Tilt the shape so that it overlaps the eyebrow on the right. Only the left side should stick out of the initial circle. When you get the shape right, darken the lines. On the left side, lightly sketch a small, C-shaped curved line for the rest of the curved bill of Luigi's cap. Don't make this curved line too long. When you get the curvature right, darken the line.
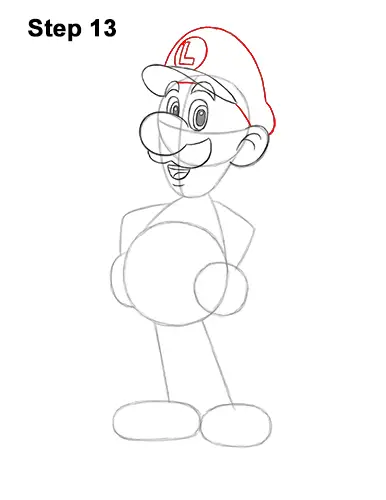
Step 13: Above the head, draw a tall arc for the top part of this Nintendo character's cap. Pay attention to how high the line goes. Sketch lightly at first so that you get the shape right. Add a shorter, curved line on the right side of the back of the cap. In front of the cap, above the bill, draw a small letter L for "Luigi." Add a small circle around the L to finish the Luigi logo.
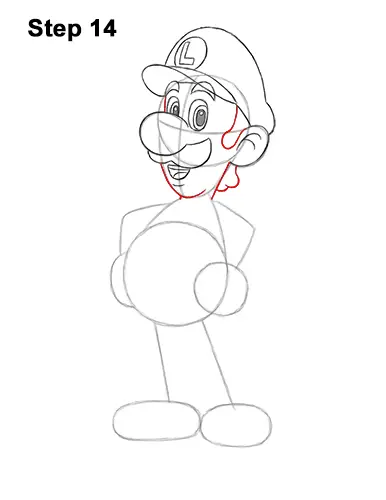
Step 14: To the left of the ear, draw a long, U-shaped line for the big sideburn. Add a line to the left of the eyes and below the ear for the sides of the head. Darken the bottom edge of the initial guide to create Luigi's small chin. On the right side of the head, below the ear, draw a couple of short, curved lines for the back of this Super Mario Bros. character's hair.
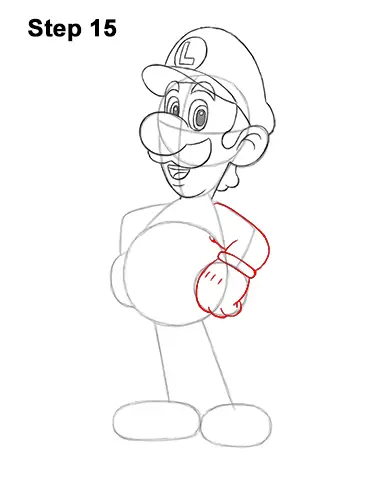
Step 15: Use the angled line on the right side of the body as a guide to draw Luigi's first arm. Darken the line but extend the line farther right at the bottom. Make the line curvier too. Draw a thin, short shape at the bottom and on top of the initial circle for the top of the glove. Add a few short, curved lines on the left to make the arm thicker. Draw the hand at the bottom inside the circle. Make the hand thinner than the circle. Add short, curved lines at the bottom for the folded fingers.
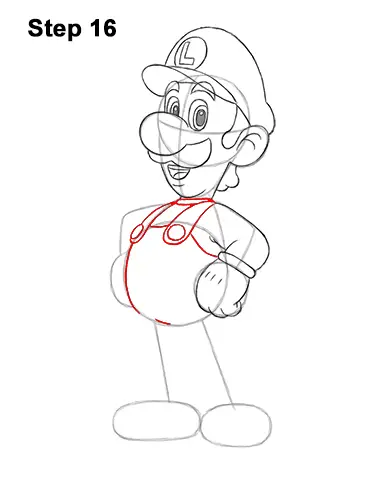
Step 16: To the left of the completed arm, inside the body, draw a small circle for the overall's first button. Draw a long, curved line around and above the button for the overall's first strap. Below Luigi's chin, draw a thin, short shape for the shirt's collar. Darken the left side of the guides for the overall's other strap. At the bottom, draw a small oval for the other button. Draw the rest of the strap on the left. Add short, curved lines at the top for the top of the overalls. Darken the left side of the initial circle for the body.
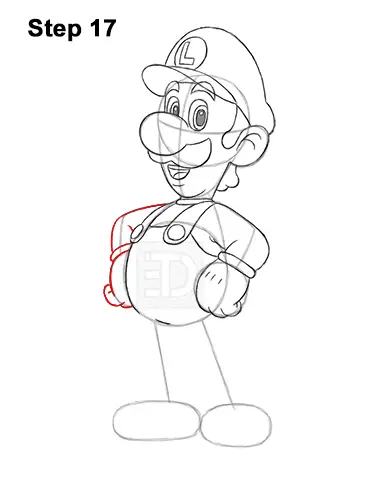
Step 17: Darken the line on the left for the visible part of Luigi's other arm but make the line wider. Use the circle at the bottom as a guide to draw this Nintendo video game character's hand. Add a short, curved line at the bottom for the visible finger.
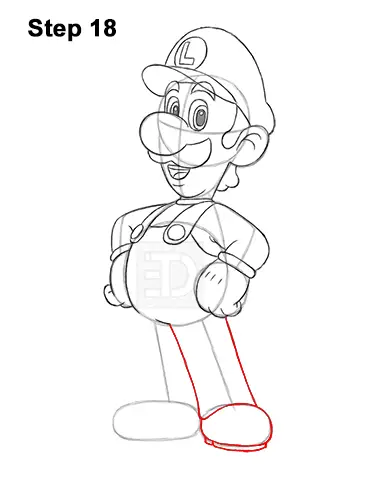
Step 18: Draw a couple of lines around the guide on the lower, right side to create the shape of Luigi's first leg. Don't make the shape of the leg too thick. Darken the oval at the bottom for the shoe. Make the bottom of the oval a bit flatter. Add a line at the bottom for the sole of this Super Mario Bros. character's shoe.
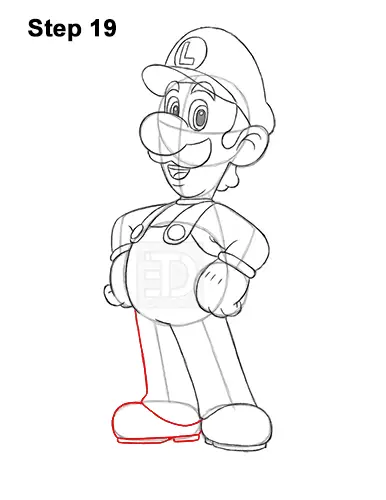
Step 19: Draw the shape of the other leg around the line on the left. Keep the leg skinny. Draw the bottom cuff over the oval and make the line curvier. Darken the oval for the shoe. Draw a couple of short lines under the oval for the shoe's sole and heel.
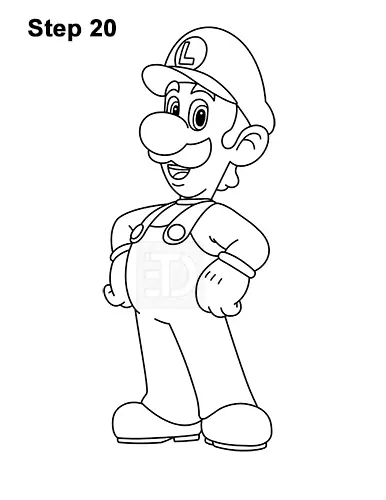
Step 20: Go over the final sketch lines with a pen, marker or any other type of permanent ink. Take your time and be careful when you ink your drawing to avoid any accidents. After the ink dries, get rid of every pencil mark with an eraser for a cleaner drawing.

Final Step: Color your Luigi drawing using colored pencils, markers or crayons! Use yellow-green for the hat and shirt. Color the skin peach and the hair and eyebrows black. Use blue for the irises and brown for the hair and shoes. Color the inside of the mouth dark red and the tongue pink. Use blue for the overalls and yellow for the buttons. Don't forget to pause the video after each step to draw at your own pace.
Thanks for visiting! Subscribe to the EasyDrawingTutorials YouTube Channel for a new tutorial every Sunday.
To learn how to draw animals, visit How2DrawAnimals.com.
To learn how to draw Manga, visit How2DrawManga.com.
RELATED TUTORIALS
 |
 |
 |


