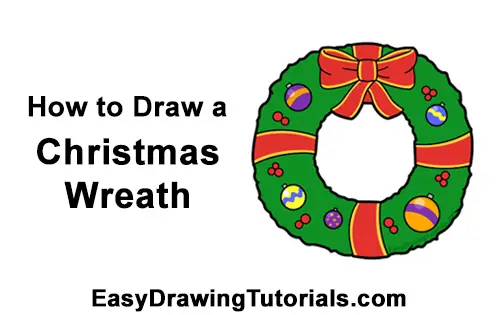
Use the step-by-step drawing instructions below to learn how to draw a Christmas Wreath. Stay tooned for more tutorials!
Stay tooned for more free drawing lessons by:
- Liking us on Facebook>>
- Subscribing on YouTube.com>>
- Visit How2DrawAnimals.com for free animal drawing tutorials>>
All of the free art lessons on EasyDrawingTutorials.com are good drawing tutorials for beginners and experienced artists alike. The online tutorials are easy to follow; they teach you the how to draw basics while showing you how to draw fun cartoon characters step by step. Each cartoon character has a video drawing tutorial option, as well as step-by-step photos and written text to follow.
RELATED TUTORIALS
 |
 |
 |
To draw this Christmas Wreath step by step, follow along with the video tutorial below and pause the video after each step to go at your own pace. You may find it easier to follow the step-by-step drawings below. The new lines in each step are shown in red, and each step is explained in the text below the photo, so you'll know exactly what to draw in each step. You may want to open the video in a new tab and use both drawing methods! Take your time and draw at your own pace.
The Narrated step-by-step video tutorial:
Intro: Start off with a pencil sketch. In the beginning stages, don’t press down too hard. Use light, smooth strokes for sketching.
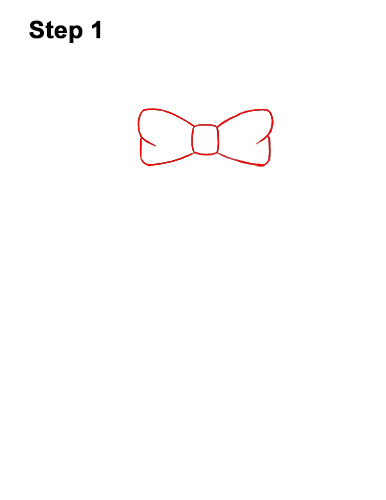
Step 1: Start the Christmas wreath by first drawing a bow at the top of the page using simple shapes and curved lines. The knot of the bow is made up of a small, rectangular shape. The sides of the bow should be bigger and they should be made up of long, curved lines.
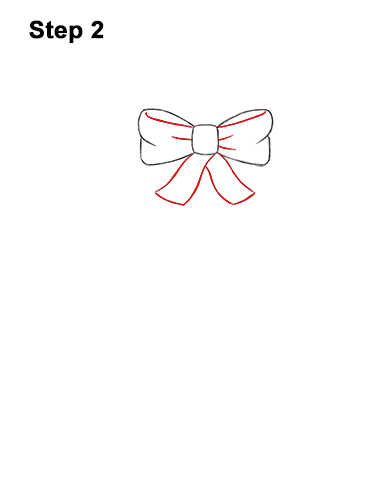
Step 2: Add two lines at the top of the bow to emphasize the ribbon folding over. On the sides of the knot, draw a couple of short lines for wrinkles on the ribbon. Coming out of the bottom of the knot, draw two thick, long, wavy shapes for the ends of the bow's ribbon.
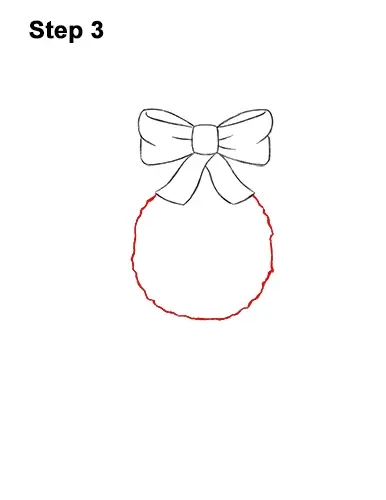
Step 3: Below the bow, draw a circle for the inner edge of the Christmas wreath. Use wavy lines as you draw the circle to represent the leafy texture of the wreath. It's okay if the circle isn't perfect. Instead pay attention to the size. It should be about as big as the outer section of the bow.
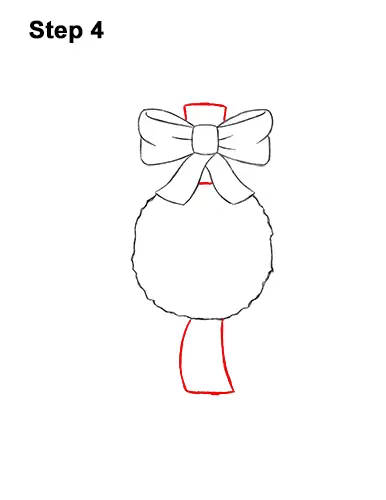
Step 4: On top of the bow, draw an angled line for more of the ribbon that's holding the wreath together. Add a smaller line between the ends of the bow's ribbon. Under the circle for the wreath's inner edge, draw a thick shape for more of the ribbon. The shape should be similar to a curved rectangle. The taller you make this rectangle, the thicker the wreath will be.
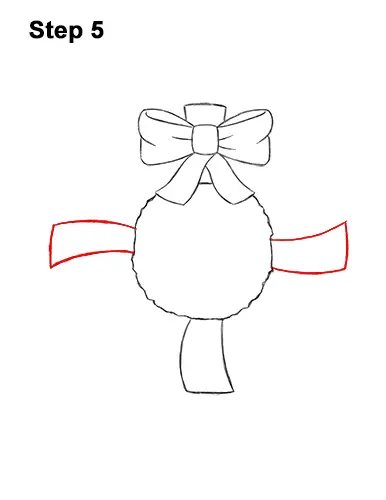
Step 5: On the sides of the Christmas wreath's inner circle, draw two more shapes similar to the one in the previous step for more of the ribbon. Again, these shapes should be similar to curved rectangles. Make them as wide as the shape on the bottom but turn them sideways. Try to keep these shapes the same with, otherwise the shape of the wreath will be irregular.


